Our site just got a new paint job. There are still a few kinks to work out, please bear with us as we work through them. Thanks for your continued support!
Toggle Nav

Build Your Own Hydroponics System
Ebb & Flow, Top Feed Drip
 New comers to hydroponics are always asking how to build an easy hydroponic system that will give great results. This month’s article addresses this question with two simple, easy-to-build hydroponic systems: the Ebb and Flow System and the Drip System.
Ebb and Flow System
Ebb and Flow is the most popular type of hydroponic system for home/hobby gardeners. This system is suitable for beginners and experts alike. In a nutshell, an ebb and flow system uses a submersible pump in a reservoir to pump nutrient solution up and into a flood tray. The flood tray fills with nutrient solution until it reaches the desired flood level, which is determined by the height of the flood and drain fittings. The nutrient solution then drains back into the reservoir. Once the pump turns off, all of the remaining nutrient solution which is still in the flood tray drains back into the reservoir through the pump. Generally speaking, the pump should flood the tray for about 15 minutes every few hours; this is known as the “flood cycle”. The frequency of flood cycles will be determined by the type of growing medium that is used.

Parts Required
Parts Required
- Flood Tray: Choose a tray that will best fit into your grow room. Remember that you will need some working space. The flood trays are available in the following sizes.
- Nutrient Reservoir: Once you have chosen the tray size you will then need to size a reservoir for the tray. The calculation for this is quite simple: Height you wish to flood in the tray (H) x Width of the tray (W) x Length of the tray (L). For this calculation it is best to convert feet into inches. Then multiply the cubic inches by 0.0043 to convert it into gallons.
Example:
For this example lets use a 3’ x 6’ American Agritech tray. The plants will be growing in 6”x6” rockwool cubes, thus the tray will flood up to 4”.
Reservoir size required (gal) = ((3’x12) x (6’ x 12) x 4”) x 0.0043
= 36” x 72” x 4” x 0.0043
= 45 gallons (minimum) - Ebb & Flow fittings: Ebb and Flow or flood and drain fittings are required for each tray. If you are using 4”x4” rockwool cubes then you will require two Ebb and Flow Flood/Drain fittings, one that is connected to the pump for flooding, and the other for drainage, two extensions and two screens.
For all other growing medium (6”x6” rockwool blocks, containers with coco coir, Ready-Gro, etc.) you will need and extra extension to make the tray flood deeper.
For trays up to 4’x4’ the ½” Ebb and Flow Flood/Drain fittings will suffice. Trays that are larger than this will require ¾” Ebb and Flow Flood/Drain fittings (at least for the drain fitting; the fill fitting diameter should match the diameter of the output on the water pump).
For these fittings, two 35mm holes need to be drilled side by side (approximately ½" - 1" apart) in the lowest point of the flood tray (always measure the diameter of the fitting against the diameter of the hole saw before drilling!).
- Tubing: The size of tubing required will depend upon the size of the Ebb and Flow Flood/Drain fitting, ½" fitting = ½" tubing, ¾” fitting =¾” tubing. The minimum length of tubing will be the distance between the top of the pump and the bottom of the tray.
- Water Pump: The recommended pumps for ebb and flow systems are as follows:
Tray Size 2’ Head* 3’ Head* 2’ x 2’ Eco Plus 185 Eco Plus 185 2' x 4' Eco Plus 185 Eco Plus 264 3' x 3' Eco Plus 264 Eco Plus 264 4’ x 4’ Eco Plus 396 Eco Plus 396 3’ x 6’ Eco Plus 396 Eco Plus 396 4’ x 6’ Eco Plus 633 Eco Plus 633 4’ x 8’ Eco Plus 1056 Eco Plus 1056
*head refers to the vertical height the pump must pump the nutrient solution up to; the distance between the water level in the reservoir and the top tray
Use an Analog or Digital Timer to effectively control the watering cycles - Growing Mediums: Some suitable growing mediums for ebb and flow systems include rockwool (both blocks and Growcubes in pots), coco fiber in pots or the Coco Boss Blocks, perlite mixes in pots and Hydroton rocks in net pots.
The flood cycle for rockwool will be once every 3-5 hours depending on plant size and environmental conditions. The best way to determine the length of time between flood cycles is to lift the rockwool blocks once every hour. Once the block feels light and it's obvious that water has been absorbed by the plant it is time for the next flood cycle. Once plants get older and bigger the frequency of the flood cycle will increase.
The flood cycle for coco in pots will depend on how quickly the top ½” of growing medium dries out (the coco turns from dark brown to light brown as it dries). If Boss Blocks are being used then the flood cycle will be once every 3-4 hours.
Hydroton rocks in net pots requires frequent flood cycles. This medium does not hold as much moisture as the above mentioned mediums. The pump can be set to either 15 min on/15 min off, 15 min on/30 min off or 15 min on/45 min off (use an analog or cycle timer for this type of set-up).
Constructing the Ebb and Flow System
- First, build the structure to hold the flood tray. The table should be high enough off the floor to allow the reservoir to slide in and out from underneath and strong enough to support the tray when it is filled with nutrient solution.
- Drill the two 35mm holes side by side for the Ebb and Flow Fill/Drain fittings. The holes should be drilled at the lowest point in the tray. Screw the fitting to the flood tray; make sure that the barbed end is on the underside of the tray and the rubber washer is on the inside of the tray.
- Place two or three Ebb and Flow Extensions into one of the Ebb and Flow Fill/Drain fittings. Place one Ebb and Flow Screen on top of the last Ebb and Flow Extension. This is the overflow for the tray.
- Place only one Ebb and Flow Screen fitting on the other Ebb and Flow Fill/Drain fitting. This is the flood fitting for the tray. This is the fitting that gets attached to the pump in the reservoir.
- Place the tray on the table ensuring that the flood and overflow fittings are over the reservoir.
- Attach the pump to the flood fitting using the ½” or ¾” tubing.
- Fill the reservoir with water and test the ebb and flow system for any leaks.
- Plug the pump into a timer and program the timer with the appropriate on/off settings.
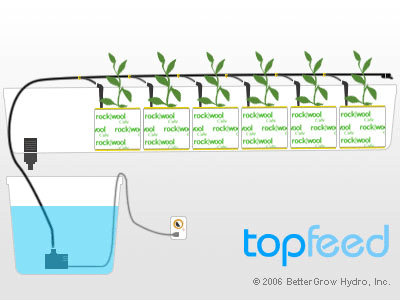
Top Feed Drip System
Commercially, drip systems are the most widely used type of hydroponic system in the world. Operation is simple; a timer controls a submersed pump, which pumps nutrient solution up through a tube to the top of the tray. From this tube 1/4” drip tubing delivers the nutrient solution to each pot/plant.
Parts RequiredTubing: Use 1/2” black tubing and not 1/2” blue tubing for the drip system. This will stop algae from growing in the tubing, which would eventually block the drippers. The length of tubing should match the length of the tray plus the height from the top of the pump to the top of the tray. It is also a good idea to purchase a 1/2” Barbed Elbow. Use the elbow at the point where the tubing goes over the top of the tray; this will stop the tubing from kinking and restricting nutrient flow.
Water Pump: The following chart can be used as a guideline to choosing the right pump. The following pumps are recommended (if more than one plant is being grown per square foot then choose a slightly more powerful pump than the one recommended):
Growing Mediums: Some suitable growing mediums for drip systems include rockwool (both blocks and Growcubes in pots), coco coir fiber in pots or the Coco Boss Blocks, perlite mixes in pots and Hydroton rocks in net pots.
The flood cycle for rockwool will be once every 3-5 hours depending on plant size and environmental conditions. The best way to determine the length of time between flood cycles is to lift the rockwool blocks once every hour. Once the block feels light and it's obvious that water has been absorbed by the plant it is time for the next flood cycle. Once plants get older and bigger the frequency of the flood cycle will increase.
The drip cycle for coco (in pots) will depend on how quickly the top half inch of growing medium dries out (the coco turns from dark brown to light brown as it dries). If Boss Blocks are being used then the drip cycle will be once every 3-4 hours.
Hydroton rocks in net pots are perfectly suited for continuous drip systems. This means that the pump is on 24/7. Hydroton rocks can also be watered in cycles of 15 min on/15 min off, 15 min on/30 min off or 15 min on/45 min off. Keep an eye on your plants; if wilting begins to occur then increase the watering cycle. Wilting may also be a sign of over watering; if your roots are beginning to rot then you want to consider decreasing the watering cycle.
Parts Required
- Flood Tray:The ideal type of tray for drip systems are the same as that for the Ebb and Flow System with the addition of a few smaller trays: 6” Slab Trays and 8” Slab Trays
- Nutrient Reservoir: The reservoir for drip systems are typically smaller than the ones required for ebb and flow systems. For a 2x2, 2x4 and a 3x3 a 10 gallon reservoir can be used, for a 4x4 tray a 20 gallon can be used.
- Drip fittings:
Aqua Turret Drip System- 1/2" Black Tubing
- 0.15 Drip Tubing (1-2 feet per plant)
- Brass Fittings (one per plant)
- Aqua Turret Drip Stake (one per plant)
- Brass Fitting Insertion Tool
- 1/2” Black Tubing
- 1/4” Drip Tubing (1-2 feet per plant)
- 1/4” Barbed Straight Coupling (one per plant)
- Basket Dripper or Angle Dripper (one per plant)
In addition to the above fittings both systems will also require one Ebb and Flow Fill/Drain fitting. This should be placed in the lowest point of the tray. Use a 35mm hole saw to drill the hole for this fitting.
| Tray Size | Water Pump |
| Single Slab Tray | Eco Plus 185 |
| Multiple Slab Trays | Eco Plus 185 |
| 2’ x 2’ | Eco Plus 185 |
| 2' x 4' | Eco Plus 185 |
| 3' x 3' | Eco Plus 185 |
| 4’ x 4’ | Eco Plus 264 |
| 3’ x 6’ | Eco Plus 396 |
| 4’ x 6’ | Eco Plus 396 |
| 4’ x 8’ | Eco Plus 633 |
The flood cycle for rockwool will be once every 3-5 hours depending on plant size and environmental conditions. The best way to determine the length of time between flood cycles is to lift the rockwool blocks once every hour. Once the block feels light and it's obvious that water has been absorbed by the plant it is time for the next flood cycle. Once plants get older and bigger the frequency of the flood cycle will increase.
The drip cycle for coco (in pots) will depend on how quickly the top half inch of growing medium dries out (the coco turns from dark brown to light brown as it dries). If Boss Blocks are being used then the drip cycle will be once every 3-4 hours.
Hydroton rocks in net pots are perfectly suited for continuous drip systems. This means that the pump is on 24/7. Hydroton rocks can also be watered in cycles of 15 min on/15 min off, 15 min on/30 min off or 15 min on/45 min off. Keep an eye on your plants; if wilting begins to occur then increase the watering cycle. Wilting may also be a sign of over watering; if your roots are beginning to rot then you want to consider decreasing the watering cycle.
Constructing the Drip System
Aqua Turret Drip System
(also works with any dripper that accepts 0.15” tubing)
- First build the table to hold the tray. The table should be high enough off the floor to allow the reservoir to slide in and out from underneath.
- Drill the 35mm hole side by side for the Ebb and Flow Fill/Drain fittings. The hole should be drilled at the lowest point in the tray. Screw the fitting to the flood tray; make sure that the barb is on the underside of the tray.
- Place only one Ebb and Flow Screen fitting on the other Ebb and Flow Fill/Drain fitting. This is the drain fitting for the tray.
- Measure the 1/2” tubing that will run on top of the tray between the plants (e.g. a 4’x 4’ tray will need at least 4½’ of tubing. This piece is known as the manifold.
- Place a Brass Fitting on the end of the Brass Insertion Tool. Force the Brass Fitting into the ½” tube. Space the Brass Fittings evenly along the ½” tubing.
- Measure and cut the 0.15 tubing. The 0.15 tubing should all be equal in length to ensure even flow rates.
- Insert the 0.15 tubing into the Brass Fitting.
- Insert the Aqua Turret Dripper into the opposite end of the 0.15" tubing. Place the Aqua Turret Dripper into the growing medium.
- Insert the ½” Elbow into the one open end of the manifold and connect it to the pump.
- Fold the other open end into a “Z” fold and zip-tie to seal the end.
- Fill the reservoir and test the system for leaks.
- Plug the pump into a timer and set the timer.
1/4” Drip System
- First build the table to hold the tray. The table should be high enough off the floor to allow the reservoir to slide in and out from underneath.
- Drill the 35mm hole side by side for the Ebb and Flow Fill/Drain fittings. The hole should be drilled at the lowest point in the tray. Screw the fitting to the flood tray; make sure that the barb is on the underside of the tray.
- Place only one Ebb and Flow Screen fitting on the other Ebb and Flow Fill/Drain fitting. This is the drain fitting for the tray.
- Measure the 1/2” tubing that will run on top of the tray between the plants e.g. A 4’x 4’ tray will need at least 4½’ of tubing. This piece is known as the manifold.
- Use a hole punch or a 2mm (1/16”) drill bit to drill holes into the 1/2” tube. The needs to be circular and uniform in size otherwise the manifold will leak. Space the holes evenly along the manifold.
- Insert ¼” Barbed Straight Coupler into the holes in the manifold.
- Measure and cut the 1/4” tubing (1-2’ per plant). The 1/4” tubing should all be equal in length to ensure even flow rates.
- Insert the 1/4” tube onto the 1/4” Barbed Straight Coupler.
- Insert the Angle or Basket Dripper into the 1/4” tube and peg it into the growing medium.
- Insert the 1/2” Elbow into the one open end of the manifold and connect it to the pump.
- Fold the other open end into a “Z” fold and zip-tie to seal the end.
- Fill the reservoir and test the system for leaks.
- Plug the pump into a timer and set the timer.